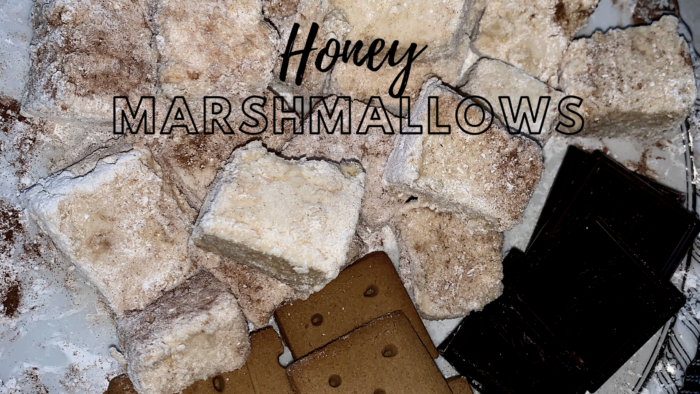

Why bother making marshmallows from scratch when you can easily snag a bag of the traditional summer treat for a buck? Well, in our quirky family, we’re all about crafting food with simple, wholesome ingredients. And when it comes to summer nights and s’mores by the campfire, we’re all in!
Sure, we could opt for store-bought versions, but where’s the fun in that? I’m a firm believer in the joy of DIY, especially when it involves creating delicious treats with my kids. After experimenting with various recipes over the years, I’ve finally landed on a simple method that’s perfect for family bonding without the stress. Plus, these homemade marshmallows aren’t just any marshmallows – they’re the fanciest and tastiest ones we’ve ever had!
Ingredients (affiliate links):
Gelatin: use a good kind like Great lakes or this one HERE . Read some of the comments and information. It is so good for joints, skin, and aging.
Vanilla: if you can stick with real vanilla extract for authentic flavor.
Honey: get a good local honey if you can or Click HERE for amazon.
Arrowroot: You can also use powdered sugar.
Silicone Pan: Awesome for effortless marshmallow removal.
Ok now let’s dive into the wonderful world of homemade marshmallows, where fluffy clouds of sweetness are waiting just for you!
Whether you love the rich taste of maple or the golden sweetness of honey, these homemade treats are sure to make your taste buds sing!
Ingredients:
- 3 tablespoons unflavored gelatin
- 1 cup cold water, divided
- 1 ½ cups maple syrup or honey (preferably raw)
- 1 teaspoon pure vanilla extract
- ¼ teaspoon salt
- Arrowroot or powdered sugar, for dusting
Instructions:
- In a mixing bowl, sprinkle gelatin over ½ cup of cold water. Let it sit for 10 minutes to get all squishy and soft.
- Meanwhile in a saucepan, mix together the remaining ½ cup of water and maple syrup or honey. Cook over medium heat, stirring every now and then for 8-10 minutes or until the mixture gets to 240°F (115°C).
- Once your maple syrup or honey mix is just right, take it off the heat and very carefully pour it into the squishy gelatin. Watch out, it’s really hot!
- Now, it’s time to get mixing! Use a hand mixer or stand mixer to beat the mixture on high speed until it gets all thick and fluffy, like a big marshmallow cloud. This will take around 10-12 minutes.
- Add the vanilla extract and salt to the mix and keep beating for another minute to make sure everything’s mixed in nicely.
- Next, get a baking dish that’s about 9×13 inches. Grease it up a little and sprinkle some arrowroot or powdered sugar all over it.
- Pour your marshmallow mixture into the baking dish and use a spatula to spread it out evenly.
- Leave your marshmallows to set at room temperature for at least 4 hours, or even better, overnight.
- Once they’re all set, cut your marshmallows into squares, or use cookie cutters to make fun shapes.
- Sprinkle some more arrowroot or powdered sugar over the top of your marshmallows to stop them from sticking together.
- Now comes the best part – eating them!
Want to try something different? Add a little bit of cinnamon, cocoa powder, or your favorite flavor to the marshmallow mix before you start beating or simply add some to your dusting powder.
Tips for Marshmallow Mastery:
- For easier roasting, leave your homemade marshmallows out for a few days to stiffen slightly. This will give them the perfect texture for toasting over an open flame!
- Experiment with different types of honey to discover new flavor profiles and create truly unique marshmallow masterpieces.
- Get creative with shapes and sizes – try using cookie cutters to make fun marshmallow shapes that will delight kids and adults alike.
- Keep your marshmallows in an airtight container at room temperature for up to two weeks.
So there you have it – the secret to elevating your s’mores game to epic proportions! Gather your family, roll up your sleeves, and dive into the wonderful world of homemade marshmallows. With just a few simple ingredients and a whole lot of love, you’ll create memories that will last a lifetime – not to mention the most delectable s’mores you’ve ever tasted!